The TinyMCE 4 javascript editor supports HTML5 and features a new interface and a complete rewrite of all plugins. TinyMCE is the standard WYSIWYG editor for online CMS and websites: if you have a custom file manager attached to the image button, it’s time to think about updating its loading code.
To do this in minutes, you can add a quick hack to the new image plugin. Of course, this tutorial covers a standard approach not related to any File Manager in particular. Your final working code will be strictly related to the File Manager in use, and its file upload and file select tools.
Step 1: get the plugin file
Start by downloading TinyMCE standard package and put it in your development environment. Every JavaScript file is now minified, so you have do download the TinyMCE development package and copy only the “js/tinymce/plugins/image/plugin.js” file in the corresponding folder of the standard package.
Create a safe copy of the original “plugin.min.js” file and rename the new one to “plugin.min.js”, so that TinyMCE would load the uncompressed file instead of the minified one.
Step 2: create the “File Manager” TinyMCE custom button
To add the “File Manager” button, editing the “js/tinymce/plugins/image/plugin.js” file, adding this line:
{name: 'my_file_manager', type: 'button', text: 'File Manager', onclick: openMyFileManager }
to the plugin element block (around line 87), after the opening code:
win = editor.windowManager.open({
 title: "Edit image",
 data: data,
 body: [
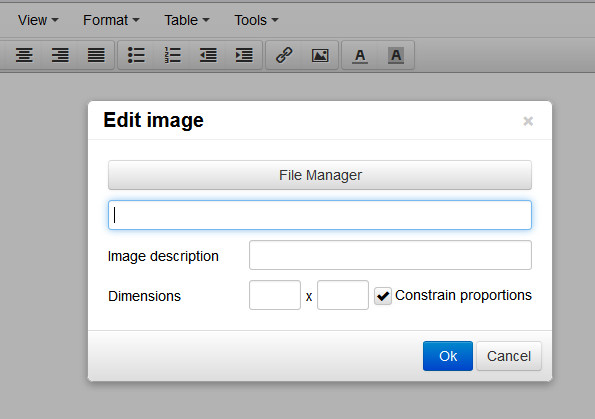
You can test it loading the TinyMCE editor in a sample page; the Image popup with the new “File Manager” button should look like this: Now, add a custom function to open the file mananger, like this:
function openMyFileManager() {
  src = win.find('#src')[0];
  window.open('PATHTOMYFILEMANAGER?tag_name='+src._id,'','width=800,height=540 ,toolbar=no,status=no,menubar=no,scrollbars=no,resizable=no');
 }
You can add it just before the “win = editor.windowManager.open … ” block around line 87.
Step 3: create a JavaScript callback in your File Manager
Now switch to your File Manager. Every one is different, but there should be an event or javascript function loaded when the user selects the image to put inside the editor. Once you locate that function, all you have to do is to get the selected image url and put it in the “source” field of the TinyMCE Image popup, whose ID is given by the “tag_name” you passed before as a GET parameter, plus a fixed “-inp” suffix. Then, you can close the File Manager.
Using JavaScript, given the TAG_NAME and IMAGE_URL parameters, you can do it like this:
window.opener.document.getElementById(TAG_NAME+"-inp").value=IMAGE_URL;
window.close();
window.opener.focus();
That’s it!
TinyMCE 4 is a good development platform, the new releases are even better. Happy customizing!
Thanks for this, exactly what i needed. You saved a lot of my time posting this
hi, can you upload or send me a full example of this implementation, with the files created for the codes etc?
I’ve not understood step 3. Can you show with a more detailed example?
can you please suggest some file managers that work well with htis method?
I wrote a new flexible and easy to integrate file Manager for TinyMCE 4. You can find it here: http://www.quivive-file-manager.de
Can this be implemented on Rails 2 ?
Check RoxyFileMan, this file browser could be used with any server side script language. However you will have to write all server scripts (it comes with PHP scripts).
Hi, thank you very much for your post, you’ve saved me a lot of time.
I would like to give my contribution.
Implementing your method and looking at the roxyfileman implementation I’ve found this configuration parameter: file_browser_callback
If you specify your function, the button for browsing files is added using the tinymce style, it’s more elegant and you don’t have to modify the image plugin source.
Hope this is useful for others 🙂
Yep they added it eventually! Thanks for the update Giovanni!
Thanks you very very much for sharing this. :)))
So happy I found it!!
Thumbs up for Giovanni also
it doesn’t work…
win = editor.windowManager.open
is undefined